Android is the most used open source, Linux-based Operating System with 2.5 billion active users. Because of its wide range of application s...
Android is the most used open source, Linux-based Operating System with 2.5 billion active users. Because of its wide range of application support, users also want to run it on personal computers.
For Mobile penetration testing, it is essential to have an android virtual machine. This android virtual machine is helpful in testing several security tools and techniques, to know how to hack android devices and to maintain access after exploiting an android device.
We will install the Android version 9 (latest up to the date) on VirtualBox. You can also install it on VMware. Before installation there are some prerequisites to follow:
Prerequisites:
- VirtualBox should be installed
- At least 4GB of RAM is required
- At least 20GB to 30GB of free disk space
- Virtualization feature should enable on the processor
Installation Steps:
Step.no: 01 Download an android iso file from an official site https://www.android-x86.org/
Select the version you wanted to install. (i.e. Android 9.0-r2)

This gives you two sites to download this iso file. Download it from here

I will download 64-bit image file.

Step.no 02 Create an Android virtual machine
Select option “New” to create a virtual machine.

Type name of the machine, select OS type as Linux, select version of OS as Linux 2.6 / 3.x / 4.x (32 bit or 64 bit) then Click on Next.

Select Memory size to be allocated, normally 2GB of RAM is sufficient for Android.

Create a virtual hard disk, the recommended size of the hard disk is 8GB.

Next it will ask a hard drive file type so, leave it default as we want to make a VDI file.

It will ask then the storage on the physical hard drive, select this option based upon your requirement. The best practice is to select default i.e. “Dynamically allocated”

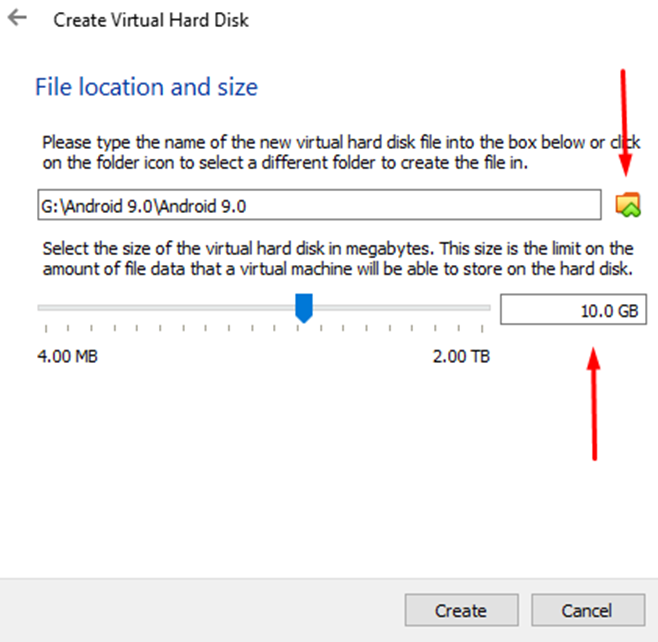
Select the File location and size of this android VDI hard drive. We will give it at least 10GB of memory. You can specify it according to your resources but remember at least 8GB is required for this machine.
Step.no 03 Configure the virtual machine
Now right click on the machine and go to settings.

Select ”System”, in Processor section give atleast 2 processors to your android machine and enable “PAE/NX” option

In Acceleration section make default the paravirtualization interface option and enable Nested Paging.

Now in the next step, set up display settings. Go to Display and increase your Video memory to at least 128Mb or more. And in the Graphics controller, change VMSVGA to VBoxVGA.

Go to Storage tab and select Controller: IDE, select Empty and from the right most corner select the tiny CD icon from where you can browse the ISO file that you have downloaded on your PC. Select the image file.

You have successfully created an android virtual machine on your virtual box.
Step.no 04 Install Android 9.0 to harddisk
Start the machine

Here you can see many options to install android 9.0 on hard disk. The easiest and simplest way is to go in “Advance options…” tab.

Select “Auto Installation – Auto Install to specified harddisk” and press Enter.

This will be asking that you have chosen Auto installation option, the installer will erase the whole /dev/sda and install Android 9.0 to it. Select Yes and press Enter.

Now select reboot option and hit ok.

You must detach the iso file from the machine in order to save the state of your machine and prevent it from running the installation steps again and again.
Go to Storage section and remove the disk image from virtual drive.

Step.no 05 Finally run the Android 9.0 machine on virtual box
Start the virtual machine again and select first option to boot your android virtual machine. it will start booting the installed android OS.

This logo will appear after 2-3 minutes. And this means your android machine is ready to use.

Some post configuration needs to be set up at first. Select your language.


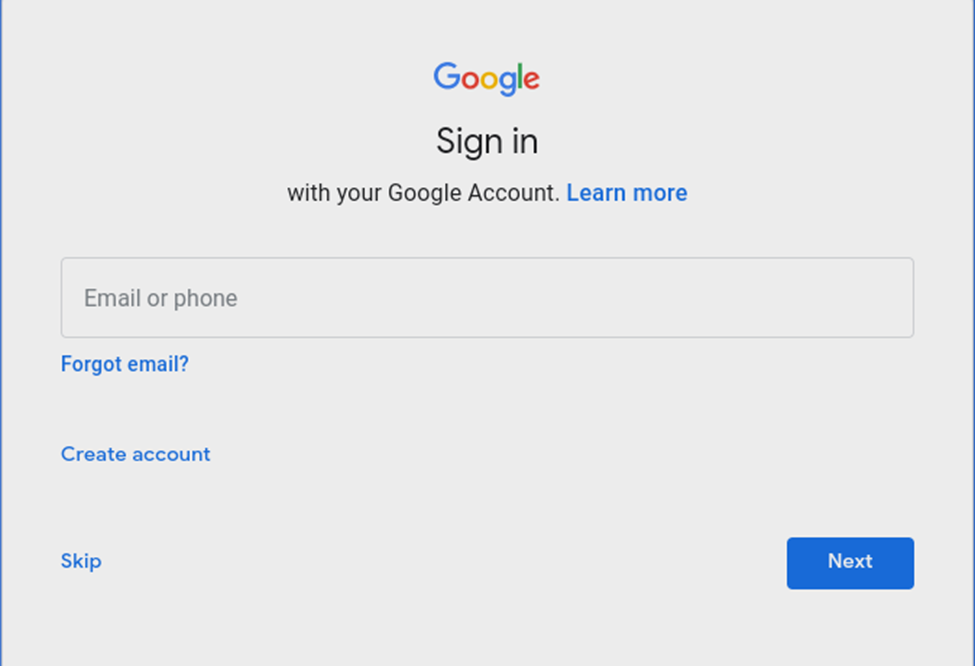
Enter your Gmail ID or skip this step.
Set the date and time of your region.

Select the “Accept” option.

And finally, You have got an android 9.0 virtual machine on your virtual box.

This article shows the easiest and shortest method to install and run Android 9.0 virtual machine in windows 10. And you can also follow the same method for QEMU & VMware.
This is a great way to get more familiar with standard Android OS and use it to learn mobile penetration testing of android application.


![Catia V5R21 Download and Install With Crack Full Version 2021 [Hindi]](https://blogger.googleusercontent.com/img/b/R29vZ2xl/AVvXsEgJ_JO_pBVqDkvX_yWPXE5gN9HtAfebBerrFTouRdOKWXGcpa1kn3Mtagia7EA9QsUCL3kftmQlUCXbX5vgAmOroI6ONZYy7Wz5ZOjrOuzwSYRxrQnTEFxeEfH7ww77he0xGNyBim9PdIw/w150/7de1dd_cbf6f3c9851a4f2caad27c21775c60c8_mv2.gif)


No comments